Friday, August 10, 2012

1/48 AFV Club 251/1 C - part 1

After holiday, finally I returned to my models...

I wanted to start a new model. When I was checking my stash, I noticed I didnt finish any of from 251 series in this year. ( note : 251 is my fav vehicle.) Also thinking our modelling competiton end of September, I have started a new 251. This time it is from AFV club and scale is 1/48.  I just made a few small corrections..

Interior is now ready for painting...


Here, for interior of  the doors, I removed the parts which was given as one mold from kit  and did my own using reference photos.. I added PE parts from my spare box.


I added armor plates to back side of seats to increase the appearance..and covered some of leather with BMF for further details..


Next step is painting of interior....


Sunday, July 8, 2012

Little lion of Babylon...


This weekend I wanted to build something quick and detailed looking. I was not building 72 scale for long time. For our local modelling web site (www.plasticbattle.com) campain I want to do an arab model..I had Revell T-72 in my stock..With other name Lion of Babylon....

When I finished building, to be honest the model was looking much better than I hope. I definetly advice this one to braille scale modellers. Only thing I did is to remove one part of the left fender. I will add hand made attchments regarding to reference photos..This is the situation up to now...

Monday, June 18, 2012

BMP update 5: Someone said camouflage?

After all this cutting, sanding and detaling it was now time for painting. I was searching for painting schema I saw very nice looking camouflage styles for this vehicle. But when I saw the photo below...I said thats it..I have to paint this camo...

I used Mr. Color and Tamiya paints.. This is my beauty...Small details are also painted..Ready for weathering steps..


Does it look like the real one? :P

Friday, June 1, 2012

BMP project update 4 ; Ready to be painted..

After spending loonngg longg time corrections and adding details, I finally finished building the model...

First photos are from the turret..Smoke launchers and antenna pods are from Voyager, the rest from Eduard..


And now finally...The whole BMP-2 on the stage....


Everything is ready to be painted..


Thursday, May 24, 2012

BMP-2 project update 3: The hull finished...

After lots of patience finally I finished the hull. Added / corrected many details. Instead of writing everything I want to share the photos.

Feel free to share if you have any comments..


Friday, April 27, 2012

BMP-2 project: update 2

BMP-2 project continues slowly but as good as I want. I have some progres. Im spending long time to build a vehicle as correct as possible, but it worths. I hope..:)

Here are some photos. The wheels and tracks I mentioned in the introduction part, were cleaned and made ready to be assembled.


I've started detaling the model with Eduard. First I cut off the thick and bad looking fender parts and replaced with Eduard's. Then I added welding traces around back doors like in the real vehicle.

There was inaccurate kit parts which needed to be removed on the back doors of the model. I removed them and added P.E. parts.


Real vehicle back doors for comparison...


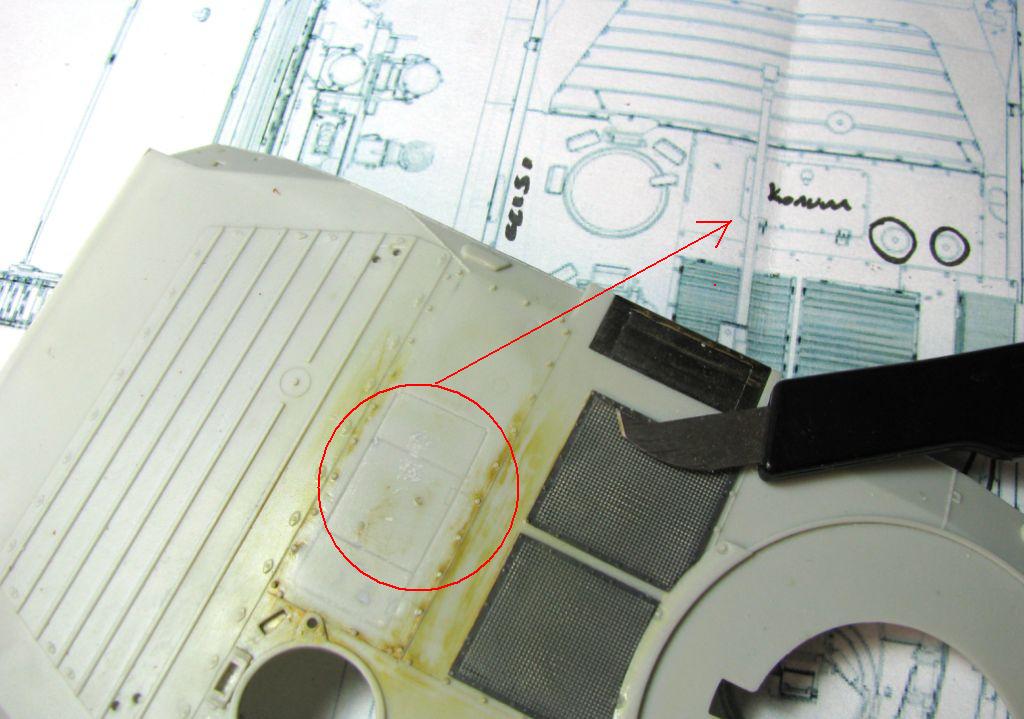
Then I've started working on upper hull. There are so many things to correct here. I started from front engine hatch. Location of the engine hatch was not correct.  I filled the wrong lines with CA, sanded and using blueprint and real photo of vehicle, I determined the correct position of the hatch.


Using mask band and ruler I scribed the new lines of the correct hatch.


As final P.E parts are added.. Finished engine hatch..


I've started working on maybe the worst part of the upper hull, back side..Size and position of the two hatches were wrong again. So I cut the back of the upper hull and filled with evergreen and sanding again again again..As I will add air filter and other small details from Eduard's set, I also removed them.  :)


Ready to be details with P.E

 
 Location of the hatches should be like in the photo below. After I prepare back side detailing parts, I will cement them all together considering the blueprint.


If you have ANY COMMENT or ADDITIONAL KNOWLEDGE about this vehicle, SAY IT NOW before it is TOO LATE..


Monday, April 9, 2012

BMP-2 project; episode 1: introduction...


When I had seen this vehicle for the first time, I said myself I had to build one of them. It's shape and camouflage types were really turned me on.

I made a little search about the kits of BMP-2 that I could buy. In other modelling forums it was being said that Dragon/Revell and Zvezda kits are all same molded.There was no difference. So I got this oldie Dragon model from one of my modeller friend. To be honest when I went for deeper detail of real vehicle, I realized that this kit is oldie but not goldie one. There are miss angled side skirts, misslocated hatches, size mistakes etc. I bought resin wheels and tracks from Master Club, detail set from  Eduard and gun barrel from JB model. I want to finish it as real as possible I can. I hope it worths.. :)

Here are the kit and the details parts...


I want to share some photos from detailing parts.. First wheels from masterclub..


Wheels are really hightly detailed but need to be cleaned..


Comparison of the resin wheel with the one coming from kit.. Obviously resin is much better...


As Master Club tracks are different then kit tracks, they come with its special wheels..There are 200 track links, 2 drive sprockets and 4 special spare tracks for upper hull..


 Comparison of kit tracks and Master Club tracks.. There are even their numbers (serial numbers??) on resin tracks.

Most important benefit of these resin tracks are, they are clickable ( no need glue) and almost no need for cleaning whereas each kit tracks have pin mark which need to be cleaned..

                                             
Now Im busy with tracks and lower hull. In next episode lower hull will be finished and started to upper hull..

Keep following...